Fun things to make for Christmas

Sharing some of my ideas with you for the Holidays!
Hello fellow hubbers, it's so nice to be back. I've been gone for a bit that's why you haven't seen any comments on your hubs, boy do I have a lot of catching up to do! But its really good to be back to Oak Harbor. I visited family including "Geegee77" in Corpus Christi, Texas and my mom for about 10 days. I really enjoyed seeing and spending time with them and other family, they were a blessing to me. But it would have been even better if Ladyjane1 and rose56 would have been there too. The temperatures there are still warmer than I am used to here in the Pacific Northwest, so for that reason it's good to be back to the brisk cool weather we are having, I guess I am true northwesterner. The trip was great except going through the x-ray scanner at the airports, that was a bit intrusive, but I totally understand why we have to do it. No complaints here.
Then my husband and I took our last RV trip of the year to the Oregon Coast, this is before we place the cover on her for the winter months. We saw some amazing waves at Ft. Stevens near Astoria during a storm that passed through while we were there. It was enjoyable but as I said before there's no place like home.
So now that I am back and Christmas is just around the corner, I wanted to share a few quick and easy projects you can make in a short time frame. I love my adorable "Ribbon Angels" and hope you will too. These little cuties and other "Seashell Angels" are featured on my Inspirational Website.
Christmas is such a fun time for making handmade gifts, food and just spending time with family. I have a tradition of making handmade ornaments with my grandchildren, they love doing it. This way they can give a gift to their parents that they personally made and they didn't have to spend money on. It's so much fun.
So lets get started shall we, grab your crafting materials and have some fun!
Ribbon Angel
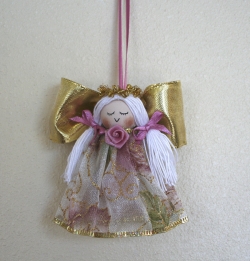
My cute Ribbon Angel
Grab your favorite fabric ribbons and get to work. This angel is so easy to do and takes no time at all. They are so beautiful and your family will love them.
You will need:
- Ribbon (1-1/2" by 9" in length gold or white for wings)
- Larger fabric ribbon for dress (2" by 13" in length)
- 2" Wooden body you can purchase at any Michaels, or Joann's fabrics or any craft store
- Thin ribbons the thinnest you can find to match the color of the outfit or wings about 14 "
- Small rose or flower of choice - to match the ribbon
- Small glue gun & glue sticks
- Acrylic paints (beige,tan & mauve or pink) for making the flesh color
- Fine point black permanent marker & blush for cheeks
- Thin cotton thread for hair (kind you use to crochet dolies works great)
Step 1: You first need to paint the body a flesh color, mix the pink, beige & tan colors to get the flesh color - then paint the lower part of the body in the mauve color, this is if you are using a mauve "see thru" ribbon as I did for the dress.
Step 2: While the body is drying take the fabric ribbon for the dress and begin to make pleats all the way around the top portion, using the glue gun to dab a bit of glue in between each pleat, until you have made the pleaded skirt to go around the neck of the body.
Step 3: You can draw the eyes and mouth on the face after the wooden body is dry and use some of your own blush for the cheeks.
Step 4: Take the ribbon dress and begin to glue to the neck of the wooden body starting at the front and going to the sides with the glue and pressing the dress down tightly for a few seconds until you have completed both sides. Now take a little hot glue and place it on the inside of the flab in back and glue the two flaps together.
Step 5: For the hair take cut 20 strands of thread into about 5" lengths. Take one of those strands and tie in the center of the stands loosely, to hold the hair in place - this is the part to be glued to the top center of the head. Take glue and place a line at the top of the wooden head right above the forehead then carefully place the hair on there and hold tightly for a few seconds till dry. Now take the hair and make sure there aren't any tangles and the it's straight and even. Turn to the backside of the head and place some glue right at the center of the backside then take a few strands of hair and cover those areas so she won't look bald in the back. Lift up the hair on the sides and add some glue there to secure in place. Then take 2 strands of thread and tie off each pigtail.
Step 6: Time to make the wings - you will take the gold ribbon and fold in thirds, then place a piece of white thread and tie in center to make the bow. Take the thinner mauve ribbon and cut an 8" piece then fold in half and glue to the inside of the bow wings facing you - this will be the hanger for the angel.
Step 7: Now place more glue on the same area of the wings add a generous portion, then take the body and place the backside of the head on that area and hold there for a few seconds till dry. It's starting to come together.
Step 8: Make two very small bows from the thin mauve ribbon and glue to the pigtails. Also make a small circle for the halo with the other gold cord about 2" or use your better judgement for the halo, add glue to the backside which is the only area that will touch the top of the hair. Take the rose and glue to the front underneath her chin area, being careful not to leave any hanging glue threads. Hot glue is funny and you have to continuously cut off the long threads.
Step 9: Last but not least, make sure the pig tails are same length and make any other adjustments as you see fit.
After you make the first one the next one will be much easier. I found the wooden bodies at Micheal's crafts or Joann's fabrics or any other craft store that you can find either online or in your town.
Blessings!
My adorable grandson!
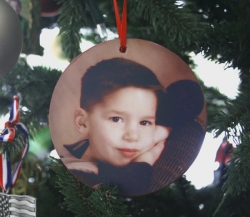
Personalized Ornaments - great for family!
You will need:
- 4" Round birch wooden blank ornament you can purchase at Michaels or Joann's fabrics
- Photo printed on glossy photo paper (make sure it's the same size as the
ornament)
- Modge podge
- Acrylic paint - for the edges (Red or gold work best)
- Paint brush
- Ribbon (6 inches or so) for bow
- Sealer (either spray or brush on kind)
- Gold wire for hanger
- Fine sand paper
Some ornaments come with a hole already pre-drilled, otherwise you will have to drill a hole large enough so you can pull a ribbon or gold hanger through. Drill the hole before you begin the process.
Before beginning make sure your photo will fit the wood. You can do this easily by placing the photo right side up then placing the wooden circle over the photo and then drawing your lines for cutting and making sure the photo fits the wood, then you can cut it to fit.
1. Spread modge podge evenly on the wooden side that the photo will adhere to. Then place the photo face up on the circle carefully making sure that it lays flat, take out any bubbles or wrinkles that may appear. Smooth out the edges and surface and let dry.
2. When dry use the exacto knife or whatever sharp edge cutting tool you have to make sure there aren't any edges hanging over the wood, turn the wood piece upside down and see, then just cut around and remove those edges, making sure you leave a smooth surface.
3. Sand the edges nicely with fine sanding paper and then paint with whatever color you like, red, gold or black work best, then let dry.
4. Take a clear acrylic sealer and brush on the ornament to seal it nicely and on the sides and back. But before you do the back make sure you have personalized it first with a black permanent fine marker, then you can brush the sealant.
5. Puncture the hold carefully not to tear the photo but just to penetrate it so you can pull the ribbon through. A wire ribbon works best for this type of ornament because it is very thin. Tie a knot in back and you are done.
These make great gifts for family and friends for Christmas! Try making them of someone's pet, they will truly love them!
Crochet scarf and scrunchie
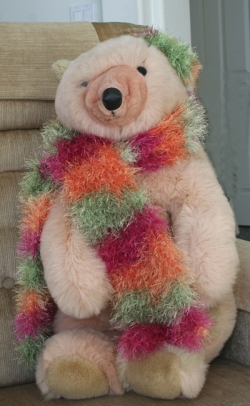
Fun Fur Scarf and Scrunchies
You can whip this crochet scarf and scrunchie out while watching your favorite television program, easy and fun to do.
For scarf you will need:
- 3 skeins fun fur variegated any color of choice
- 10-1/2 size crochet needle
Here goes: You chain 16 for the scarf this will be row 1. Then you turn chain three and then begin double crochet in the first chain. Now be careful because this fun fur is tricky, make sure you are actually double crocheting in the first chain - then double crochet all the way to the end. (14 double crochets made) Turn chain three and double crochet to the end. Do this until your piece measures 54" inches for children and 64" for an adult. That's it. tie off and cut the
For scrunchies you will need:
- Fun Fur - whatever is left over from the scarf - you should have enough to make one scrunchie
- 10-1/2 Size crochet hook
- Elastic ponytail - any color because after you complete project the color will not show.
For the scrunchie, make a slipknot and place on crochet hook. Holding the elastic ponytail band in one hand, insert the crochet hook into the center, grab yarn and pull under band, then loosely chain 3. Then double crochet all the way around the band until you covered the whole thing and you can't get another stitch in there. Tie off and cut yarn. That's it you're done - this makes a great gift for young girls or teenagers.
I truly hope your Christmas is filled with the love of family and knowledge of our Lord and Savior - Jesus!
Some great Christmas Stories
- A Christmas Story - Perfect Angel
As I walked along holding my big sisters hand we talked about Christmas. My sister asked me what I really, really wanted for Christmas this year. I thought long and hard about it before saying I just... - The White Felt Stocking: An Inspiring True Christmas Story
In our family, one of our most treasured traditions is hanging our white felt Christmas stockings up for Santa. These are no ordinary Christmas socks. They were hand-made by my Grandma Eileen, who after making...
More fun craft ideas at Amazon

© 2010 Mary Gaines


